Master your first hive inspection after winter! Learn essential steps to check queen health, food stores, brood & pests. Ensure a thriving colony this spring.
The first tentative signs of spring bring a sense of anticipation for beekeepers. After the long, cold months, the urge to check on our precious colonies is strong. The first hive inspection after winter is arguably one of the most crucial checks of the entire beekeeping year. It’s your initial opportunity to assess how well your bees weathered the winter, gauge their current strength, identify potential problems early, and set them up for a successful and productive season ahead. Get this right, and you pave the way for a thriving colony; miss crucial signs, and you could be playing catch-up all year.
This comprehensive guide, inspired by insights like those shared by David Burns (honeybeesonline.com), will walk you through everything you need to know to conduct a thorough and effective first hive inspection after winter. We’ll cover preparation, key observations, essential management tasks, and interpreting what you see inside the hive. Think of this as your essential checklist for kicking off the beekeeping season successfully.
1. Timing and Preparation: Setting the Stage for Success
Before you even think about cracking open the hive, preparation is paramount. Rushing this first check or doing it under sub-optimal conditions can do more harm than good.
When to Perform Your First Hive Inspection After Winter:
The single most important factor is temperature. Bees cluster together for warmth below approximately 10-12°C (50-55°F). Opening the hive when it’s too cold can chill the brood (eggs, larvae, pupae), potentially killing them and setting the colony back significantly.
- Ideal Temperature: Aim for a calm, sunny day when the ambient temperature is consistently above 13-15°C (mid-to-high 50s °F). Some experienced beekeepers might venture in at slightly lower temperatures for a very quick check if absolutely necessary, but for the thorough first hive inspection after winter, waiting for warmth is best.
- Avoid Wind and Rain: Wind makes bees defensive and rapidly cools the exposed brood nest. Rain is obviously a no-go.
- Time of Day: Midday, when temperatures are typically highest and many forager bees are out, is usually the best time.
Gather Your Tools and Equipment:
Have everything ready before you approach the hive. Fumbling for tools stresses both you and the bees.
- Protective Gear: Suit, veil, gloves – ensure they are clean and free of holes. Even if your bees are usually docile, their temper can be unpredictable early in the season.
- Smoker: Clean and ready with fuel (pine needles, wood shavings, hessian sacking). Ensure you have a lighter or matches.
- Hive Tool: Essential for prying apart boxes and frames sealed with propolis. A scraper tool is also handy for cleaning.
- Notebook and Pen/Pencil: Crucial for recording observations. You won’t remember everything! [Internal Link: Importance of Beekeeping Records]
- Optional: Frame perch, camera (for documenting issues or unusual findings), queen marking kit (if you plan to mark her), spare container for burr comb or diseased comb.
Know What You’re Looking For:
Go into the inspection with a clear mental checklist. For the first hive inspection after winter, your primary goals are to confirm:
- The colony is queenright (queen present and laying).
- Adequate food stores (honey and pollen).
- Sufficient population for spring build-up.
- Absence of urgent disease or pest issues.
- Enough space for expansion.
2. Opening the Hive: Calmness is Key
Approach the hive calmly from the side or rear, avoiding the main flight path at the entrance.
Applying Smoke:
Smoke masks the bees’ alarm pheromone (iso-pentyl acetate), preventing a colony-wide defensive response. It also encourages some bees to engorge on honey, making them slightly more docile.
- Initial Puffs: Gently puff smoke into the entrance (2-3 puffs). Wait 30-60 seconds.
- Under the Lid: Crack the lid slightly and puff smoke across the top bars. Wait another 30-60 seconds.
- During Inspection: Use smoke sparingly as needed. A little puff across the top bars every few frames, or if the bees become agitated (‘boiling’ over the frames), is usually sufficient. Too much smoke can disrupt the colony excessively. As David Burns demonstrates, smoking from the top helps drive bees downwards.
Removing Hive Components:
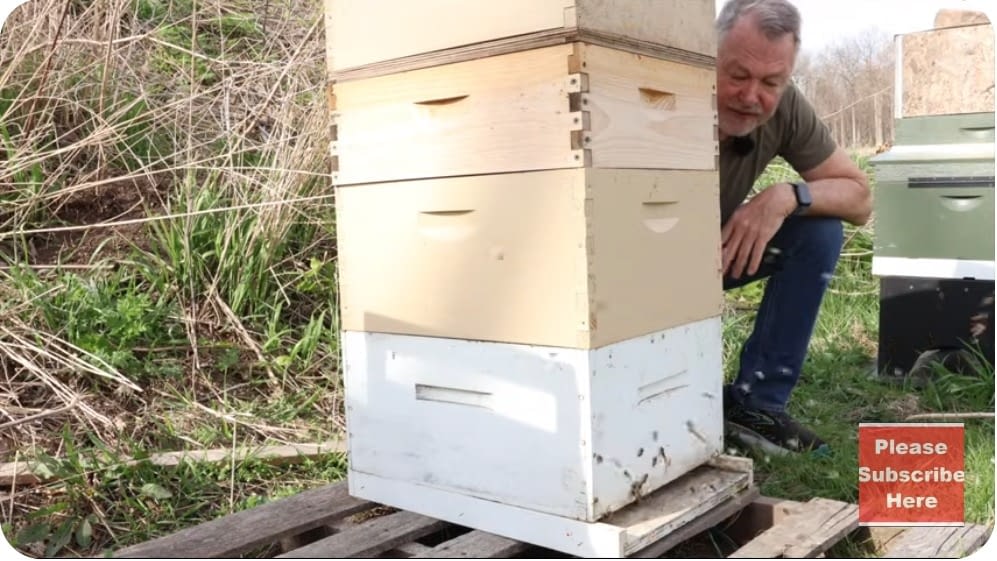
- Carefully remove the outer cover and inner cover (or crown board). Note any moisture – excessive condensation might indicate ventilation issues that need addressing. [Internal Link: Winter Hive Preparation and Ventilation]
- If you have supers on from winter (like the medium super David Burns had), assess them first. Propolis, the bees’ sticky glue, will be particularly tough in cooler weather, so use your hive tool firmly but gently.
3. Inside the Hive: The Core Checks of Your First Hive Inspection After Winter
This is where you gather the critical information. Work methodically, usually starting from an outer frame and moving inwards towards the brood nest.
Assessing Colony Strength and Food Stores:
- Bee Population: How many frames are well-covered with bees (often called ‘seams’ of bees)? A strong colony might cover 6-8 frames or more in a standard brood box early in spring. Fewer than 4-5 frames might indicate a weaker colony needing closer monitoring or potential support.
- Honey Stores: Look for frames containing capped honey. How much is there? Bees consume significant stores during late winter/early spring brood rearing. They should ideally have at least 2-3 full frames of honey available until reliable nectar flows begin (like dandelions, as mentioned in the video summary). If stores are low, immediate feeding might be necessary.
- Pollen Stores (Bee Bread): Locate cells packed with pollen, often in a band around the brood area. Different colours indicate diverse floral sources, which is excellent for bee nutrition. Pollen is vital protein for feeding larvae. A lack of pollen can severely limit brood rearing, even if honey is plentiful. David Burns observed pollen in the super, correctly inferring the likely presence of brood nearby.
Finding the Queen and Checking Brood (The Heart of the Inspection):
This is essential for confirming the colony is viable.
- Queen Spotting (Optional but Ideal): Gently scan the frames, especially those with eggs and young larvae. Look for the larger, longer bee. If you spot her, note her appearance. Is she marked? Does she look healthy? Don’t panic if you can’t find her immediately; it can be tricky.
- Evidence of a Laying Queen (Essential): Even if you don’t see the queen, finding eggs is proof she has been active very recently (within the last 3 days). Look deep into the bottom of polished, empty cells in the centre of the brood nest. Eggs are tiny, white, and shaped like miniature grains of rice, standing upright in the cell centre. As David Burns initially experienced, sometimes you need to look carefully across several frames. Finding eggs is a key objective of the first hive inspection after winter.
- Larvae: Look for C-shaped white larvae curled in the bottom of cells, progressing in size from tiny specks to plump grubs filling the cell base. Healthy larvae are pearly white.
- Capped Brood: These are cells containing pupating bees, capped with a light brown, slightly raised wax covering. Look for a solid, contiguous pattern. A scattered, ‘shotgun’ pattern can indicate problems like poor queen fertility, disease, or chilling.
- Drone Brood vs. Queen Cells: Drone brood cells are larger and have a more domed, bullet-shaped capping compared to worker brood. They are typically found on the periphery of the brood nest or in patches. It’s crucial, especially during a first hive inspection after winter, to differentiate drone brood from queen cells. Queen cells are much larger, peanut-shaped structures, usually hanging vertically from the frame face (supersedure cells) or along the bottom edge (swarm cells). Finding queen cells requires immediate attention – the colony might be planning to swarm or replace their queen. David Burns correctly identified drone brood in his inspection.
Health Check: Disease and Pest Spotting:
Early detection is vital.
- Brood Diseases: Look closely at larvae and capped brood.
- European Foulbrood (EFB): Larvae die before capping, appearing twisted, yellow/brown, and potentially melting down. David Burns specifically mentioned checking for European Foulbrood.
- American Foulbrood (AFB): Larvae die after capping. Cappings may appear sunken, greasy, or perforated. If you poke a matchstick into a suspect cell and draw it out, AFB often creates a characteristic brown ‘ropey’ slime. AFB is a notifiable disease in the UK – suspect cases must be reported to the National Bee Unit.
- Chalkbrood: Affected larvae die and turn into hard, white or grey/black ‘mummies’ resembling chalk pieces, often visible in cell entrances or on the hive floor.
- Sacbrood: Larvae die within an intact ‘sac’, often appearing gondola-shaped with a dark, raised head.
- Varroa Mites: These damaging external parasites are ubiquitous. While you might spot them on adult bees (small reddish-brown dots), a proper check often involves monitoring mite drop on a sticky board (insert for 24-72 hours) or performing a sugar roll or alcohol wash later in the season when bee numbers are higher. Assume mites are present and plan your Integrated Pest Management (IPM) strategy. [Internal Link: Effective Varroa Management Strategies]
- Pests:
- Small Hive Beetle (SHB): As David Burns found, spotting a single SHB or a few in a strong, healthy hive isn’t necessarily cause for alarm; strong colonies can usually manage small numbers. However, monitor their presence. Look for the small, dark beetles (about 1/3 size of a bee) and slimy trails or larvae if infestation is heavy.
- Wax Moth: Look for webbing, tunnels, and cocoons, especially on stored comb or in weaker colonies.
4. Management Tasks During the First Hive Inspection After Winter
Based on your observations, you may need to take action:
- Frame Management:
- Remove any old, dark, or damaged frames (aim to rotate out 1-2 old brood frames each year).
- Clean off excess burr comb or propolis that hinders manipulation.
- If the brood nest is biased to one side, you might centralise it and move frames of honey/pollen closer to the edges of the brood area, ensuring food is accessible. Reintroduce frames carefully without rolling bees.
- Providing Space (Swarm Prevention): If the hive is crowded (bees covering 80%+ of frames) and has a strong brood pattern, consider adding another brood box (if using multiple brood chambers) or a honey super (if nectar flow is starting or imminent) to prevent swarming. Finding swarm cells is a strong indicator that space is needed now, and splitting the hive might be necessary. [Internal Link: Guide to Splitting Hives]
- Queen Excluder: If adding a honey super and you want to ensure the queen doesn’t lay eggs in it, place a queen excluder between the top brood box and the super. David Burns installed one during his inspection for this purpose.
- Feeding: Reassess based on stores. If honey frames are scarce (<2 full frames) and no significant nectar flow has started (e.g., dandelions aren’t yet abundant), provide supplementary feeding (1:1 sugar syrup or fondant). As David Burns considered, having the feeder ready is prudent, even if you initially stopped feeding when natural sources appeared.
5. Closing Up and Crucial Record Keeping
Efficiency is good – David Burns aimed for around 12 minutes – but thoroughness is more important for this first look.
- Reassemble Carefully: Place frames back in the same order unless you deliberately rearranged them. Ensure correct bee space between frames and boxes. Place the inner cover and roof back securely.
- Record Everything: Immediately write down your observations in your notebook:
- Date, time, weather.
- Colony identifier.
- Number of frames of bees.
- Approximate frames of honey and pollen.
- Confirmation of queenright status (eggs/larvae seen? Queen spotted?).
- Brood pattern assessment.
- Any signs of disease or pests (Varroa level if checked).
- Any queen cells found (number, type, location).
- Actions taken (feeding, added super, removed frames, etc.).
- Plan for the next inspection (e.g., “Check again in 7-10 days” if queen cells were seen or queen status was uncertain; “Check in 14 days” if all looked good).
These records are invaluable for tracking colony progress and making informed management decisions throughout the year. Your first hive inspection after winter notes form the baseline.
6. Pro Tips for a Smooth First Hive Inspection After Winter
- Handle Propolis: Be aware that propolis is much stickier and harder in cooler spring temperatures. Use your hive tool decisively but avoid jarring movements.
- Work Efficiently but Don’t Rush: Have a plan, but take the time needed to observe properly. Minimise the time the brood nest is exposed to cold.
- Handle Frames Gently: Lift frames straight up. Avoid rolling bees between frames. Hold frames over the open hive to ensure any falling bees (or the queen!) land safely inside.
- Stay Calm: Your movements and attitude transfer to the bees. Smooth, deliberate actions are less likely to provoke defensiveness.
7. Conclusion: Setting the Tone for the Season
The first hive inspection after winter is more than just a check-up; it’s a vital assessment that informs your beekeeping strategy for the critical spring build-up period. By carefully evaluating colony strength, food reserves, queen status, health, and space requirements, you can address potential issues proactively and provide your bees with the best possible start to the season.
Remember to prioritise timing based on weather, prepare thoroughly, observe carefully, and keep detailed records. This foundational inspection paves the way for managing swarm potential, maximising honey production, and ensuring the long-term health and success of your colony. Your bees have survived the winter; now it’s your job to help them thrive in the spring. Conducting a methodical first hive inspection after winter is the essential first step.
